Sunday, October 15, 2006

Linux Command To Confirm Bad Sector

Hard disk being one of the vital components in computer system. Unfortunately, hard disk is also being one of the most high risk and sensitive components that is prone to failures, owed to the fact of mechanical subsystem attached!

The Linux command badblocks could be used to run bad sector burn-in test on a new or suspected faulty hard disk. Just get a low end PC or server installed with Linux OS, attach the target hard disk to the IDE or SCSI bus, and run the badblocks command on the target hard disk. For example,

badblocks -svw -t random -p 3 /dev/sdb

get badblocks to perform three rounds of destructive write of random data to the second SCSI hard disk.

Be careful! The option switch -w performs destructive write. Never use this option switch on a partition with filesystem. Instead, use -n to perform non-destructive read-write on a partition with filesystem!

Related information:

  • Search more related info with Google Search engine built-in

Checklist To Tune DB2 Performance

DBA suggests few of the recommended database performance tuning tips for IBM DB2 database engine that is running on Linux server.

  • Linux kernel parameters tuning that applicable to DB2 version 8.1 and 8.2.

    Executing command sysctl -A to print out current kernel parameters setting. Some of the notable are

    • kernel.sem (Semaphore setting)
      Recommended Value : 250 256000 32 1024

    • kernel.msgmni (Maximum system-wide queues)
      Recommended Value : 1024

    • kernel.msgmax (Maximum size of messages in byte)
      Recommended Value : 65536

    • kernel.msgmnb (Default size of queue in byte)
      Recommended Value : 65536

    In order to retain these changes of kernel parameters on every system reboot, add the updated kernel parameters setting to /etc/sysctl.conf system file to do the great job.

  • DB2 database configurable parameters tuning.

    After connecting to database called my_test_db by executing db2 connect to my_test_db, running another DB2 command db2 autoconfigure apply none to get DB2 database engine calculate the best recommended value of DB2 database configurable parameters. Some of the notable are

    • LOGPRIMARY / LOGFILSIZ
      Larger log buffer required for OLTP workloads with high transaction rate.

    • CHNGPGS_THRESH
      For databases with heavy update transaction workloads, make sure there are enough clean pages in the buffer pool by setting the parameter value equal to or less than the best recommended value calculated by DB2 database engine.

    • LOCKLIST
      The amount of storage that is allocated to the lock list. Increase this value if lock escalations causing performance concerns, that logged as warnings in the db2diag.log file.

    • DBHEAP
      Database heap per database. Needs to be increased for larger buffer pools.

    • NUM_IOCLEANERS
      Large buffer pools require a higher number of asynchronous page cleaners.

  • Alternate page cleaning algorithm tuning.

    DB2 UDB ESE v8.2 introduces a new buffer pool page cleaning algorithm which is not turned on by default. It is necessary to test this new page cleaning algorithm with the database workload. To turn on this alternate page cleaning algorithm, executing DB2 command

    db2set DB2_USE_ALTERNATE_PAGE_CLEANING=YES
Related information:
  • Search more related info with Google Search engine built-in

Disable Linux Reboot On CTRL+ALT+DEL

Don't ever press CTRL+ALT+DEL key combination in a Linux server!

Windows guys used to press CTRL+ALT+DEL key combination follow by ENTER key to immediately lock the server running on Windows 2000 or Windows XP and above when they leave the server.

What is the default behaviour when pressing CTRL+ALT+DEL key combination in a Linux machine? Well, the default action of Linux in responding to CTRL+ALT+DEL key combination is to reboot the Linux machine immediately! Just press it once, not twice as in Windows Me, and Linux will not be kind to ask confirmation before it really rebooting itself!

Anyway, this Linux default behaviour in responding to CTRL+ALT+DEL key combination pressed could be tweaked, indeed. Edit the /etc/inittab system file, look for the line containing ctrlaltdel keyword, and then either

  1. Remark the line ca::ctrlaltdel:/sbin/shutdown -t3 -r now to disable Linux from responding to the CTRL+ALT+DEL key combination

               or

  2. Replace the /sbin/shutdown -t3 -r now with something else, such as

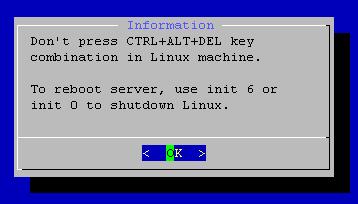
    dialog --clear --title "Information" --msgbox "Don't press CTRL+ALT+DEL key combination in Linux machine.\n\nTo reboot server, use init 6 or init 0 to shutdown Linux." 10 40;clear

    which use the dialog box command to alert users with a text-based GUI information dialog box.
Impress Linux users with text-based GUI dialog box control.

Related information:
  • The dialog box command is not a standard program installed by most Linux distribution. Find the dialog package from respective Linux distribution and install it.
  • Search more related info with Google Search engine built-in

Which Command Is Linux Refer

Opss! Executing ls command at keith login account displaying directories in blue color, executable file in green color, and plain text file in white color, etc.

But, when executing the same simple ls command at root login account does not differentiate file type by color scheme. How come?

Users who are familiar with shell built-in command alias will know that it is the alias that wrap the ls command with --color=none option switch. At the command prompt, type

alias | grep ls

will able to tell the fact of this.

The which command is used to find out which command the Linux shell interpreter is referring to in the current login session. The simple form of which command, such as which ls will show the path of the ls command without telling the alias name of it. Well, tweak which command with its command option switch and wrap it with alias command, such as this

alias which='alias | /usr/bin/which --tty-only --read-alias --show-dot --show-tilde'

Execute the which ls again, will now able to show both the ls command path and the alias of it, as shown in the diagram.

using the linux which command and alias command

Related information:

alias Shorten Long Linux Command

Tired of typing Linux command because of long list of command option switches? Try to use the command alias to relieve tired of typing long Linux command then.

As the command name suggests, the Linux shell built-in command alias allows a user-defined command to represent

  1. A system command with long arguments, such as

    find . -type d -print

    This find command used with a long option switches to list all directories that exists from the current directory downwards. The find command could be rather long if more find command option switches applied.

    This long command line could be made simple with an alias, such as

    alias dirfind='find . -type d -print'

    that allows user to execute the short user-defined command dirfind instead of typing out that long command line.

  2. A series of system commands, such as

    tar -zcvpf bin.tgz bin; [ $? -eq 0 ] && echo DONE || echo FAIL

    These system commands execute sequentially, aim to check the tarball archive creation status upon its completion. If success then echo DONE else echo FAIL.

    Again, by using the alias command could make it shorter and simple enough, such as

    alias chkbkp='tar -zcvpf bin.tgz bin; [ $? -eq 0 ] && echo DONE || echo FAIL'

    where the user could execute chkbkp at command prompt and the Linux shell will expanding it to that commands series.
Related information:
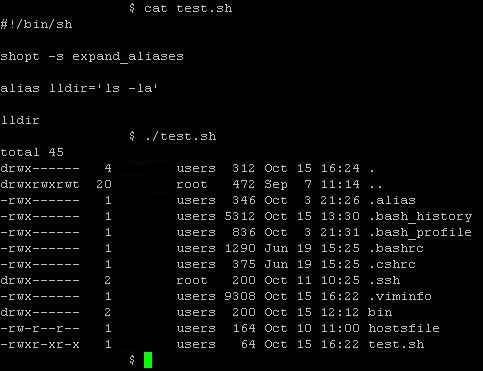
  • It is not advisable to declare and use alias in shell scripts. It is better to use a variable or a function for the purpose. Anyway, if insist, it is technically possible to use alias in shell scripts by turning on shell scripts option shopt -s expand_aliases before declaring and using an alias inside the shell scripts, such as the sample in diagram below.

  • Use alias in bash shell scripts with shopt -s expand_aliases enabled

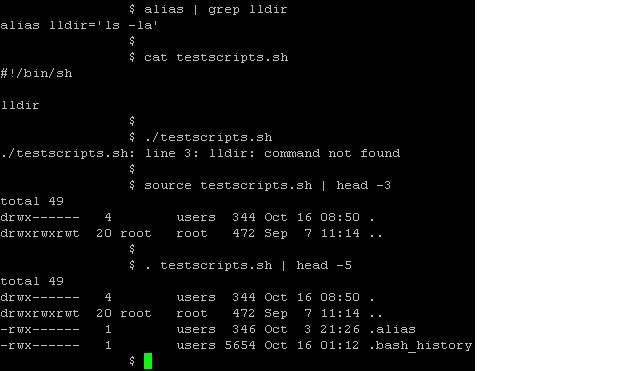
  • By default, the parent shell where a shell scripts executed will always spawn the scripts execution into a subshell, unless explicitly run the shell scripts in the current shell environment. Shell scripts that is running in subshell will not able to use aliases defined in parent shell environment!

    To run a shell scripts in current shell environment instead of spawning into subshell, use one of these two syntax

    source testscripts.sh
                or
    . testscripts.sh

  • How to run shell scripts in subshell. How to run shell scripts in the current shell?

  • In Linux system, there is a file named .bashrc in each home directory. Use this file to define aliases, which will make the defined aliases effective on each login.
  • The login profile .bash_profile could also be used to define aliases. In fact, it is the .bash_profile which execute the .bashrc while a user login.
  • To remove an alias, simply use the shell built-in command unalias, such as unalias chkbkp
  • To list all the aliases defined in the current login session, just type the command alias at the command prompt will do.
  • Which command is the Linux shell refers to
  • Search more related info with Google Search engine built-in

Saturday, October 14, 2006

Booting Thin Client Diskless Workstation

Bootp, shorts for Bootstrap Protocol, is an UDP network protocol which is originally defined in RFC 951 to assign IP address for network clients. Bootp is well suitable to apply in diskless workstation, workstation without operating system installed, or simply called thin client.

Bootp is not DHCP! Although both of these two protocols sound similar at first thought, but they are technically different and could be co-exists in the same server or network segment.

Hospitality management system giant, Micros System Inc, makes good use of bootp in its high rank Point-Of-Sale system called Micros 8700 HMS.

When the diskless Micros PC Workstation power on, the bootp enabled network interface card will broadcast its MAC address to the network. When the bootp daemon running on the Micros host receives the broadcast packets, it will assign a valid IP address follow by transferring a DOS operating system image to the PC Workstation according to the MAC-IP-Image mapping maintained in the bootpd configuration file.

Once the image transferring (via tftp protocol) completed, the diskless PC Workstation starts to boot up with the OS image parking in memory segment that act as RAM-DISK. When the boot up completed, the Micros diskless PC workstation functions as if it is a normal desktop PC pre-installed with DOS OS.
Bootpd server and clients could be reside on different network segment by deploying bootp relay agent. To make thing simple or get it up and running right during initial roll out, put both bootpd server and client on the same network segment.

Checklist when thin client unable getting IP address:

  1. Replace a known good unit of thin client to rule out possibilities of

    • Faulty boot ROM embedded in NIC that is bootp enabled
    • Faulty Ethernet patch cable
    • faulty network access point or LAN point

  2. Bootp daemon is not running. In Linux/Unix, execute

    ps -ef | grep bootpd
                or
    lsof -i | grep 67

    to confirm bootp daemon is running and listening to legacy port number (as shown in /etc/services file)

  3. Incorrect MAC address to IP address mapping maintained in /etc/bootptab bootpd configuration file

  4. ARP cache conflict at bootpd server. Executing the command

    arp -a

    to list the bootpd server arp cache. Confirm that there is no ARP cache conflict. To delete the conflict, for example conflict on IP address 192.168.1.3, execute command

    arp -d 192.168.1.3

  5. Use cross-over patch cable or straight Ethernet cable and a hub to directly link up the bootpd server and client to form an simple isolate network. If it works in this simple network infrastructure, then get network experts sit in for assistant. There might be firewalls or routers that have blocked the UDP packets from reaching to bootpd server.
Related information:
  • Tftp protocol in brief

    • Host A sends an read request (RRQ) or write request (WRQ) packet to host B. The packet containing the filename and transfer mode.
    • Host B replies with an acknowledgement packet (ACK) to WRQ or directly with a DATA packet in case of RRQ. The reply also serves to inform host A of which port on host B the remaining packets should be sent to.
    • The source host sends numbered DATA packets to the destination host, all but the last containing a full-sized block of data. The destination host replies with numbered ACK packets for all DATA packets.
    • The final DATA packet must contain less than a full-sized block of data to signal that it is the last. If the size of the transferred file is an exact multiple of the block-size, the source sends a final DATA packet containing 0 bytes of data.

  • Search more related info with Google Search engine built-in

Thursday, October 12, 2006

Repair Corrupted Outlook PST OST File

PST, known as Microsoft Outlook personal folder file or email archive file, used to archive emails out from the mail box at server side to a local storage or network drive.

OST, known as Microsoft Outlook offline folder file, allows user to work with Microsoft Exchange mail box in an offline mode. For example, emails composed, Contacts or Calendar changes, etc, will be storing in the offline folder. These changes made in offline folder will be automatically synchronize with Microsoft Exchange Server once hook up to the network - emails composed will be sending out immediately and Contacts or Calendar changes are updated to server side objects.

Both the Microsoft Outlook PST and OST files are believed using MSDE database engine.

MSDE is a light-weight freeware version of Microsoft SQL Server database engine that Microsoft offers to attract database users (especially MS Access users, developers, students, educators, etc) to develop database projects using Microsoft SQL Server. The latest release of MSDE is called SQL Server Express edition.

MSDE built with limitation of accessing up to 2GB worth of data only. The same limitation occurs in MS Outlook PST and OST file as well!
Watch the size of PST and OST file! If they getting fatty, trim them down quickly to save archives of email from hitting the 2GB limitation or a file corruption will happened soon! The best practice is to create multiple PST or OST files to categorize email archives. For those email with attachment, it is easily reaching the 2GB limitation. So, more PST or OST files are needed to archive such emails with attachment!

Office 2000 and higher with latest patches installed is nice enough to alert users with an error message and disallow users from adding or receiving new email item, so to safeguard PST or OST file to become oversize and corrupted. Earlier versions of MS Outlook does not display any error or warning messages and allow users to oversize the PST or OST file until corruption!

Microsoft offers a tool called PST2GB to recover a MS Outlook PST file that is corrupted after storing over 2GB worth of data. Microsoft alleged that PST2GB is not a tool that is 100% work at all time! If PST2GB does work, it does not recover all of the data (the truncated data is missing).
PST2GB merely create a truncated copy of the PST file to under 2GB. The copy that is left after the PST2GB completes does not have all the original data because the PST2GB forcibly cuts a user defined amount of data (below 2GB) from the PST file.

In brief,
  1. Data or the emails archive after the truncation boundary will gone missing.
  2. There must be enough disk space, 2GB free disk space if as maximum as possible of recovery desired.
Steps to recover corrupted PST file as per Microsoft KB296088 (applied to MS Outlook 97 to MS Outlook 2002)

  1. Download the PST2GB from Microsoft Download Center

  2. Extract the downloaded file 2gb152.exe to an empty folder for these five files - Msstdfmt.dll, Msvbvm60.dll, Pst2gb.exe, Readme.rtf, Readme.txt

  3. Start the Pst2gb.exe program.

  4. Click Browse to select the oversize PST file and then click Open.

  5. Click Create, select the name and location of the truncated data file to be created, and then click Save.

  6. Enter the amount of the data that intended to truncate in the PST file. There is no absolute ideal figure for this but for the best results is using 20 to 25MB, more or less. If that works, repeat the process and truncate the original oversize PST file by only 15MB. If that works, then try the process with 5MB. If 25MB does not work, repeat the process and truncate the original PST by 35MB. If the process does not work, increase the amount until the process is successful.

  7. Run the Inbox Repair Tool scanpst.exe on the smaller PST file.

  8. Open the repaired PST file in Microsoft Outlook.

  9. (Recommended but optional) If the file opens, right-click the root folder of the PST, click Properties, and then click Compact Now to start the compression. For a file of this size, the compression may take approximately 4-8 hours.

  10. If the file does not open, discard the truncated PST file, and repeat the process with the original PST file. Truncate more data than in the first attempt, and try the process again.

If the following error message arise when trying to run the PST2GB Utility

Run-time Error '713': Class not Registered. You need the following file to be installed on your machine. MSSTDFMT.DLL

To resolve this error, follow these steps:
  1. Microsoft Windows 98, Microsoft Windows 98 SE, Microsoft Windows ME

    1. Copy the MSstdfmt.dll file to the C:\Windows\System folder.

    2. Open a command prompt, and then type the following command

      REGSVR32 C:\Windows\System\MSSTDFMT.DLL

  2. Microsoft Windows NT, Microsoft Windows 2000, and Microsoft Windows XP

    1. Copy the MSstdfmt.dll to the C:\<windir>\System32 folder.

    2. Open a command prompt and type the following command

      REGSVR32 C:\<windir>\System32\MSSTDFMT.DLL

      where <windir> is either the WINNT or the Windows directory.
Related information: